In this example we will be using the GlobalPatron platform to streamline the process of collecting positive reviews for a business or product.
The first step is to create a form which asks users to rate their overall experience, and depending on their answer, we want to show them a second question asking whether they are willing to recommend the product to others.

The way to make the second question appear only if they rate their experience "5 stars" is to use the conditional logic module in the right menu of the form editor:

The logic rules would look like this:

Now we have a form, with a conditionally appearing "Would you be willing to leave us a review" question that only shows up for people who have rated our product a 5 stars.
The final step is to decide when to show the instructions to the user explaining how they need to submit the review. There are several options for showing these instructions:
Option A - Redirect user directly to the review website after they submit the form (easy)
This is the most common and user-friendly scenario. With this option, after the form has been submitted, if they have indicated that they are happy to leave us a review, we automatically redirect them to our review page, otherwise we redirect them to a "generic" thank you page. The way to do this is with a "Conditional" thanks page URL using the "Thanks Page" module in the right menu of the original forms editor:

This will open up a window where we can specify both the default thank you page URL, as well as the "conditional" thanks page URL which is used only for people who indicated that they are willing to leave us a review:
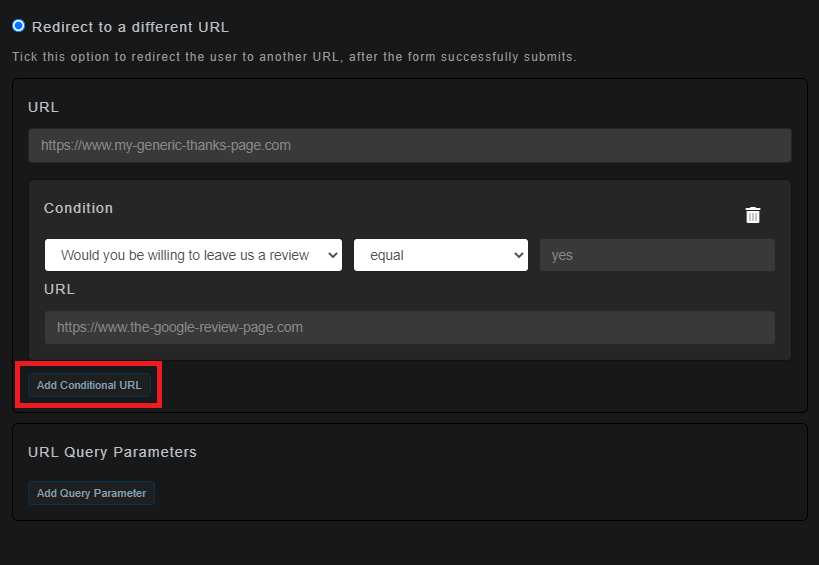
It's as simple as that! Note: If you don't have a "thank you page" that's fine, you can create your own hosted "thank you" page in GlobalPatron too, details here (How can I create a custom thank you page?)
Option B - Display Instructions before they submit the form (easy)
With this option, we immediately display instructions to the user showing them how to submit a review as soon as they say they are willing to leave a review. The advantage of this option is that it's easiest to setup, the disadvantage though is that we will not be saving their feedback on our own form because they will be leaving our form as soon as they click on the review link. (i.e. happy users click the link and leave our form to go to the review site, and unhappy users don't see the link and submit our own form). Depending on your use case this may or may not be a problem for you.
To go ahead with "Option B", simply add a link that is pointing to your review listing:
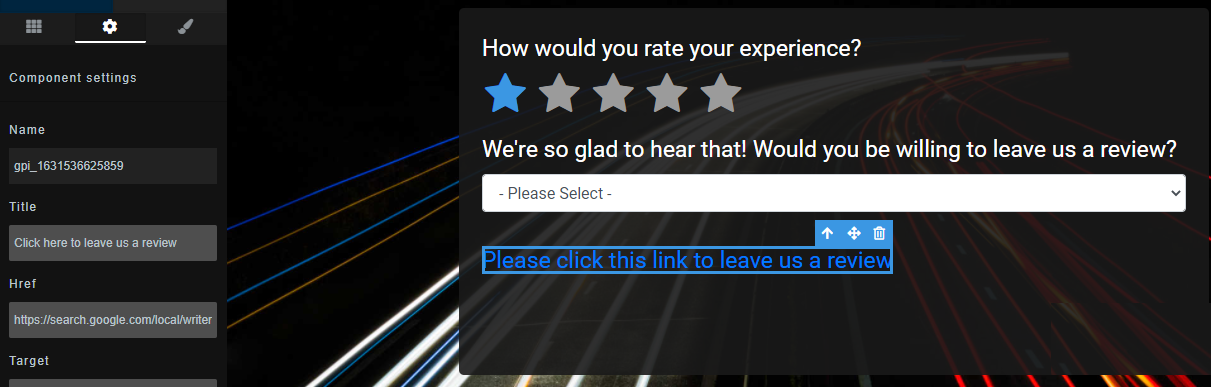
Our next step is to make this review link only appear if the user has picked "Yes" to leaving us a review, so we add this additional conditional logic section, and we're done:
Option C - Display instructions on a custom thank you page after they submit the form (harder).
With this option, we never automatically redirect the user to a review website, instead, after they submit the form we redirect them to our own "smart" thank you page that displays relevant instructions to the user based on what they filled out on the form.
First create a "clone" of your existing form, and configure this cloned form to act as our custom "thank you page" by hiding its navigation and action buttons (How can I create a custom thank you page?)
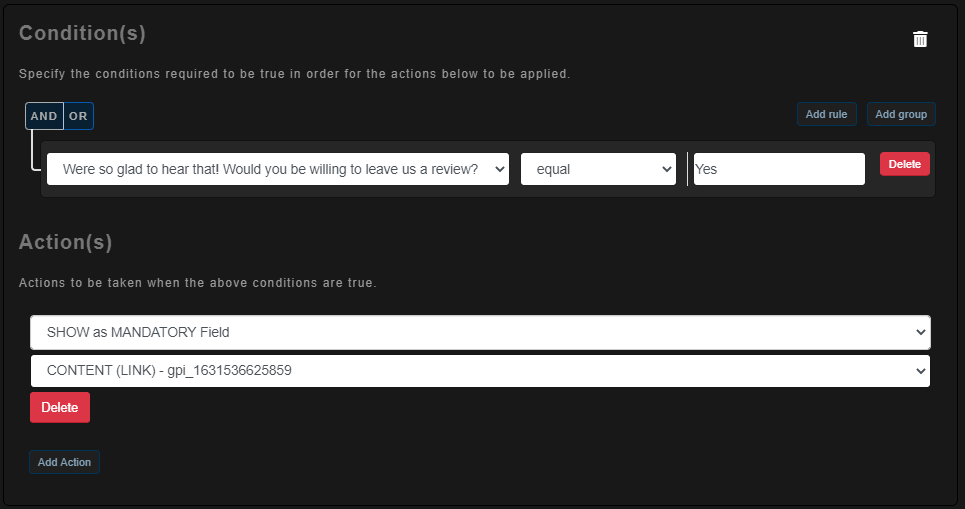
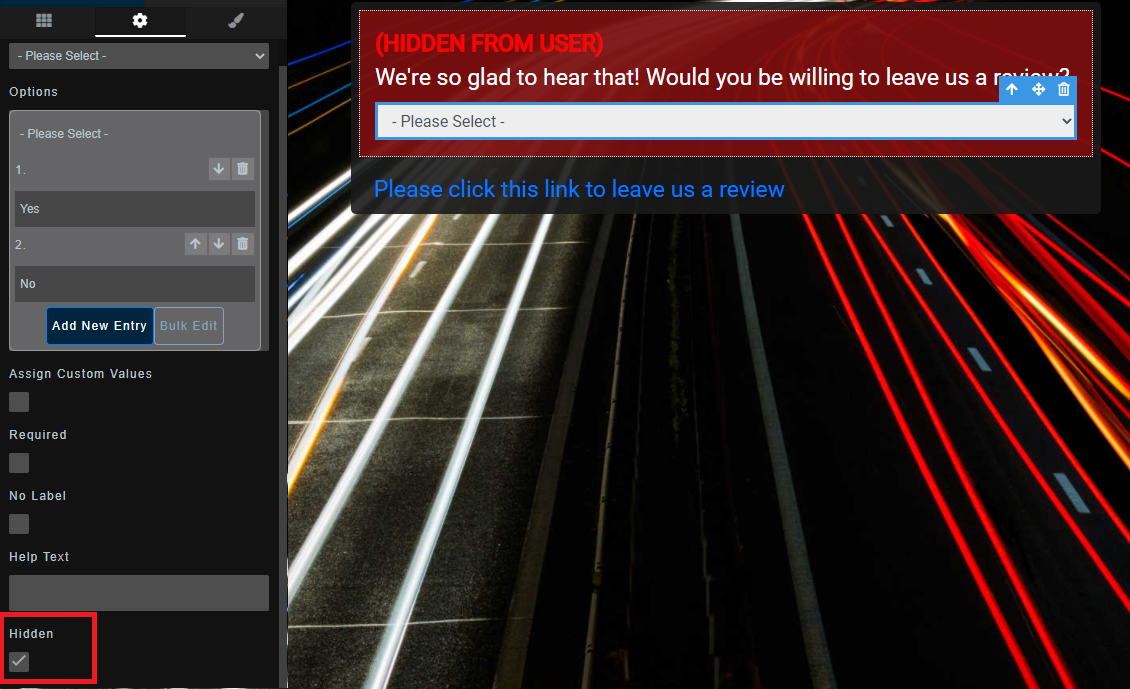
On this thank you page, hide the "Would you be willing to leave us a review" question, but still leave it there as we want to be able to pre-populate it based on what the user chooses on the main form, and to be able to use its value in conditional logic on the thank you page. On this thank you page also add a link to your review listing.
On this thank you page we include conditional logic to show relevant content based on what the users review was on the previous form (e.g. only show the link for users who answered "Yes" to "Would you be willing to leave us a review")
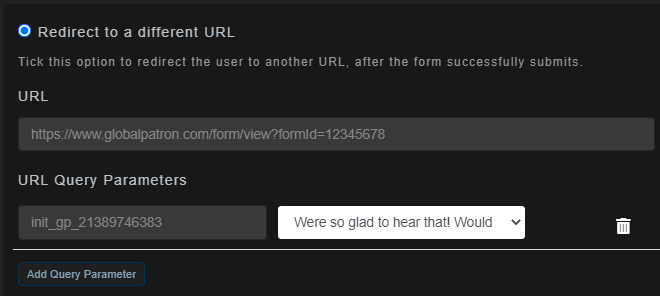
Once our thank you page is created, we can configure our original form to redirect to this thank you page by using the "Thanks Page" module in the right menu of the original forms editor:
This will open up a window where we can specify the URL of our recently created "thank you page", and (importantly) we can pass our forms values to the thank you page so that the thank you page fields can be pre-filled with the users selections. To pre-fill fields on the thanks page we use the naming convention init_FIELDNAME. E.g. below, the name of the field being prefilled is gp_21389746383
To get the system name of a field, simply click on that field, and view its "Name" property that looks similar to this:
We now have a form that determines whether a customer is suitable for being asked to leave a review, and on submission, we redirect them to our own custom thank you page that shows a relevant set of fields or instructions depending on their responses on the previous form.